Adjustments & Refinements

I might be creating another piece with “Perpetual No.1” DNA. I’ve been exploring ways to update and improve the design, while holding onto the elements that make it work so well.

New additions include:

-Slightly larger, shadow-style moon phase display.

-Thin trim on the edge of the number panels for a little more depth and detail.

-Slightly different gear proportions. 

There’s no type in the radial number panels yet. I’ve printed out copies so that I can experiment with different number styles. Same with the hands and gear-spokes. Once I’ve solidified the design of those elements I’ll incorporate them into a finished drawing.

More soon!

20 years of clocks

I can’t believe it’s been 20 years! 

Here’s a comprehensive collection of every piece I made since this clockwork obsession began. It’s been a lot of fun for me to look back at how my work has evolved. If all goes well I’ll make another one of these videos in 10 years…maybe even 20? That might be pushing it.

Hop over to the video on YouTube and let me know what your favorite is.

Enjoy the journey!

New free standing design

I’ve been sitting on the looser version of this drawing for awhile. I wanted to finish it, and incorporate the new tellurion dial.

This piece is designed to be a triangular prism shape with three sides. Placed in the center of a room, it would be an interesting form to walk around. That said, this same design could very easily be four sided, which would work well if it’s up against a wall.

One benefit to this design is that if it’s scaled to be really tall, the dials will still be close to eye level. That means you get the presence of a big piece, with the ability to get in close to the gears and the fun stuff.

The three dials could all be the time, but it would likely be three different complications. Time, tellurion, perpetual calendar, moon, or maybe a planisphere (night sky/star tracker).

Could be a really fun one! 

New Tellurion Design

New Tellurion Design

I’ve been working out a new tellurion design for consideration in a potential commission. I was drawing while I woke up in the morning (which I often do) and sketched the sun in a way that was a little more wild and stylized than in my previous tellurion designs. I liked it a lot, and had to do a finished drawing of it.

In this complication, the earth spins once a day, the moon orbits the earth according to it’s cycle, and the whole unit in the center rotates once every 365.25 days. The sun and moon tabs indicate the solstice and equinox.

There will also be gears visible in the negative space between the sun and dial.

New Design

I’ve been working on a drawing for a new piece that combines the cantilevered gears, and wild & torn apart design of No.7, with the layout and mechanisms of “Perpetual No.1” and “Perth”. This is what I came up with.

I’m actually really excited about this one. As soon as I brought “Mechanical No.7” out of it’s crate, and hung it on the wall, I was fueled to create something in that realm, but updated. I’m really happy that I never sold that clock. It marks a period in my artistic development that I want to reference, and remember.

A bit about the perpetual complication that I’m planning for this piece. If you look closely, you’ll notice four tabs. Those mark the two equinox and two solstice positions. I’ve designed this particular perpetual calendar mechanism to have a third hand, which moves just behind the month hand. Instead of jumping from month to month, this hand will move a little every day, so it will point to the exact day when the solstice and equinox occur.

Here are some comparisons that show the two designs that are being integrated to create the new one.

No.7 had the wobbly compound pendulum, but the limited length means it lacked inertia, and therefore accuracy. I think I can design a traditional one-second pendulum that’s both accurate, and works with the design. And of course I’ll still be using the always-interesting Arnfield gravity escapement.

As for the actual fabrication and sculpting, I really want to give this one some time. In order to truly give it the “No.7” treatment, there’s a lot of little things that need to be included. The fluidly sculpted pillars, the clusters of barnacle-like screws covering the surface, and maybe some other strange and organic details to bring it home. 

This one hasn’t been commissioned yet, and I’m not sure I’ll have time in the immediate future to create it on my own, but this piece needs to exist some day. 

New Mechanical No.7 Video

Even though this is one of my older clocks, “Mechanical No.7” is special to me, so I thought it deserved an updated video with my newer filming equipment.

My skill has drastically improved since this piece. Both mechanically, and my metal-carving skills. However there’s something about this piece. The design is completely unbridled, which reflects a time when I was experimenting a lot, and taking visual risks. I also like the way the larger gears are cantilevered, and out in the open — visually unimpeded by the clocks frame. Then there are these little details, like the non-functional screws that appear on the surface like barnacles. Finally, the pillars are completely sculpted, and transition right into the plates.

As an artist, it’s interesting to revisit my old work. Not just to see how far I’ve come, but also to see what I may have gotten away from that I might like to revisit.

I’ve been working on a “Mechanical No.7” / “Perth” crossover. I’ll post that next.

Gear spokes

Sometimes you can use the CNC machines, but sometimes you need a jewelers saw with a 4/0 blade. Today I’m cutting out the spokes of the decorative gear for the new quartz clock. The teeth were cut on the lathe. After I cut out the spokes, it’s on to the sculpting part.

Fun stuff!

All cut out

All cut out and fitting together. Now it’s time to make a lot of screws, and holes, and taps, and spacers.

While I wait for “Perth” to arrive in Australia (which could actually take a while) I’ll have a nice chunk of time to work away on this clock. I’ll do another post once it’s assembled, but not-yet-sculpted.

Should be a fun piece!

Next quartz project

The fabrication of my latest quartz commission has begun. Similar to my last piece, this one will have time on the large dial, and a sweep seconds hand on the small dial. This clock also features a free-spinning non-functional gear, designed with initials in the spokes.

More soon.

Off to Australia!

“Perth” is all packed up and ready to take to the shipping company, where all of these boxes will be put into one big crate, and put on a plane for Australia.

Very excited, and also debilitatingly anxious.

Can’t wait to visit the other side of the world!

New Quartz Piece!

New quartz clock finished!

It’s been awhile since I’ve had the pleasure of making a smaller piece like this one. My last two commissions were huge undertakings, each taking thousands of hours. During that period there just wasn’t any time to accept commissions for smaller work, and the long wait deterred any potential opportunities.

I’m loving the way this one came out. It might be one of my favorite quartz pieces yet.

Contact me if you’d like a custom clockwork sculpture of your own.

Perth Finished Video

In late 2019, I finished “Perpetual No.1”. As the name indicates, it was my first clock featuring a perpetual calendar complication. In June 2020, I was contacted by a gentleman from Perth, Australia who was interested in commissioning a piece based on the “Perpetual No.1” design. After a thorough back-and-forth with drawings, emails, and phone calls, we arrived at a this beautiful design. 


However, work didn’t start right away. 


People always speak of the patience it must take for me to create these works. But I would also like to express my gratitude for the patience that my clients have. When I was first contacted for this clock, I had just started work on “The Grasmere Commission”, a nearly two-year project. Then, this piece required over a year to complete and months to properly test and refine. To top it off, there was a three-month delay when I moved my shop to another location. In total, the client had to wait over 3 years to see a finished piece, and by the time, it’s delivered it will be closer to four years.


In 2023, this clock, titled “Perth”, was completed. I believe it was worth the wait.


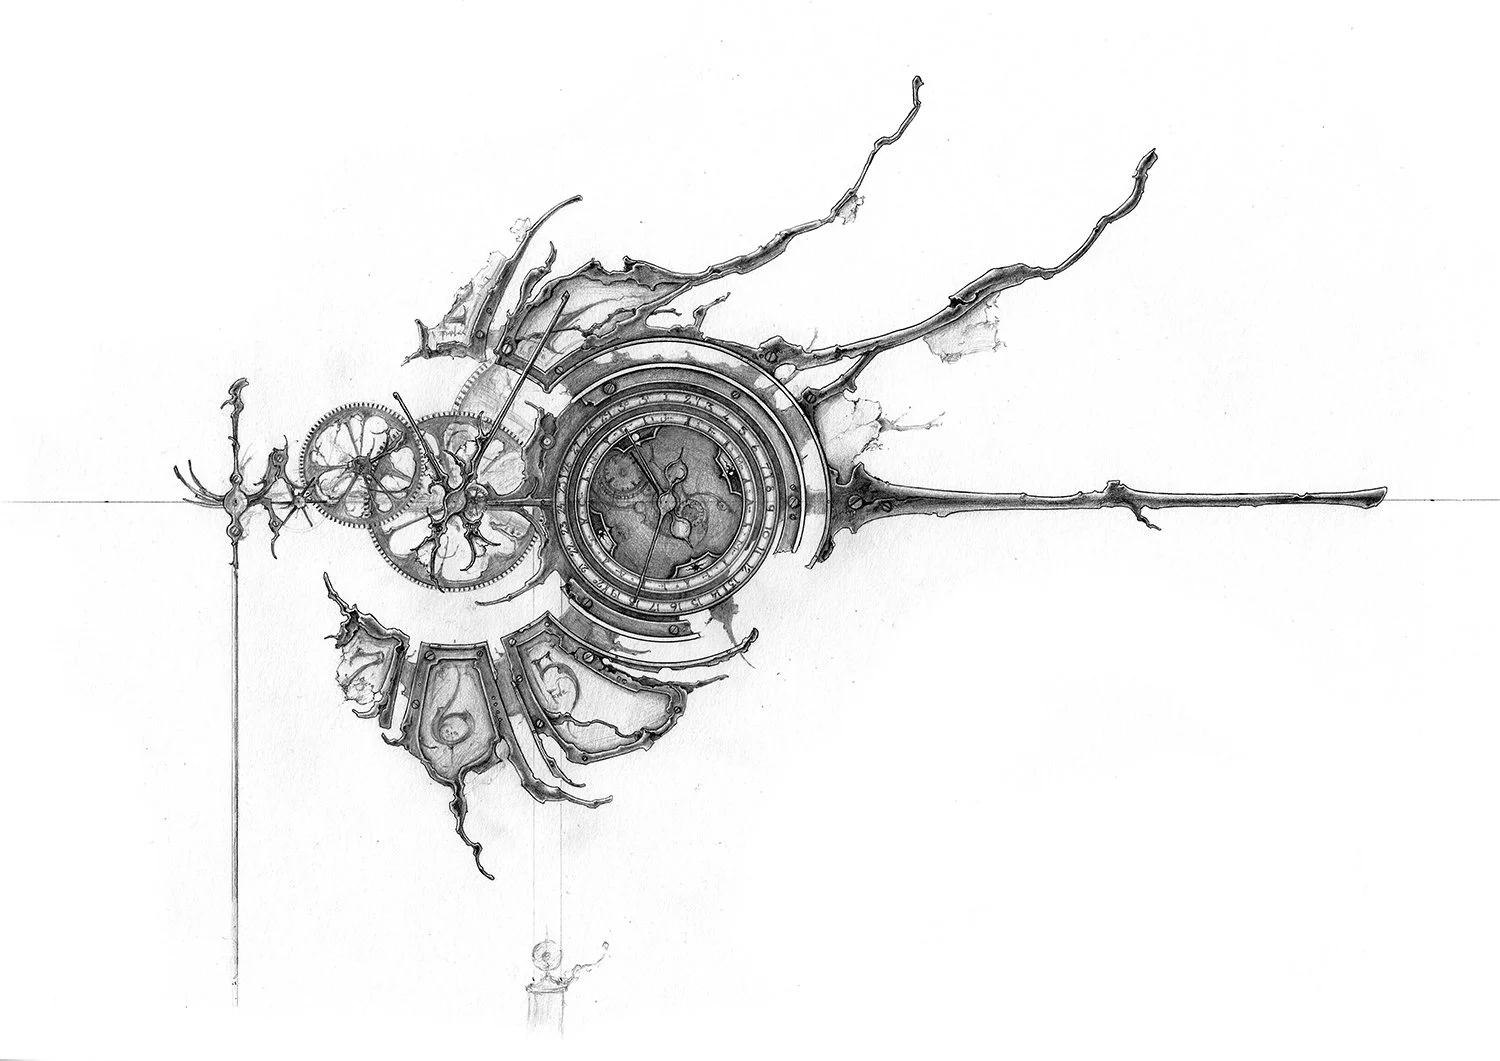
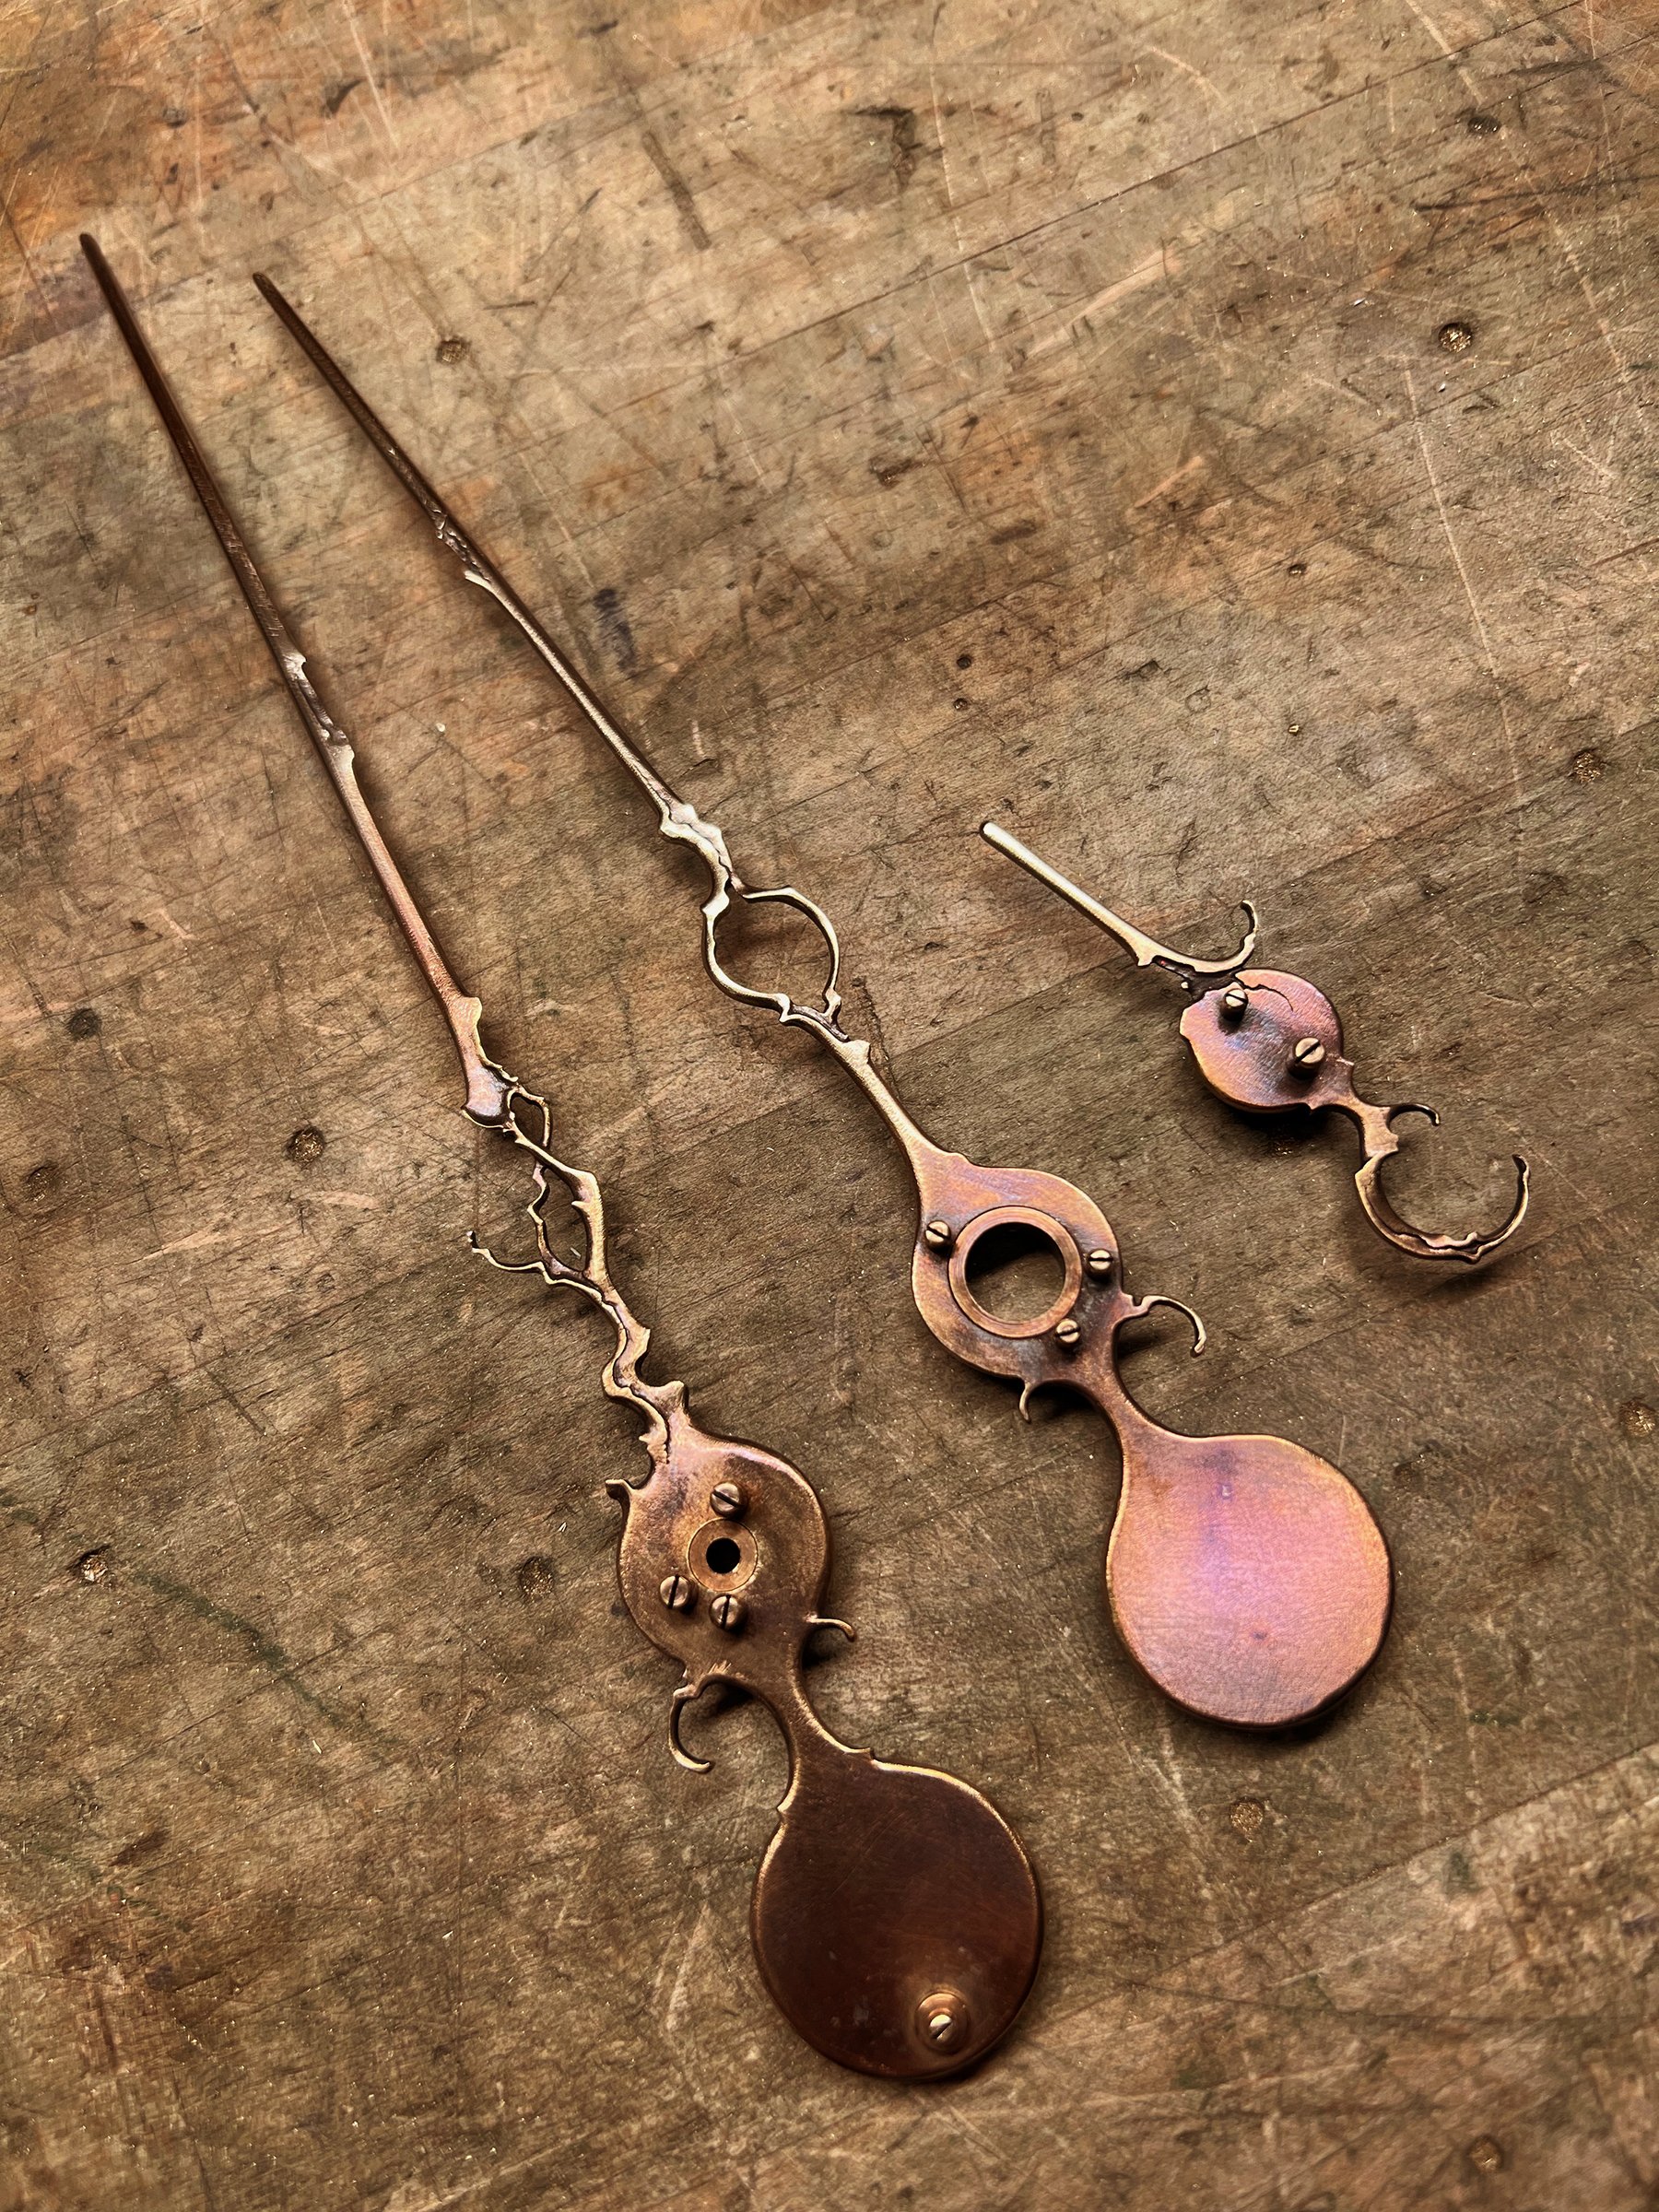
This piece shares a lot of DNA with “Perpetual No.1” but has some very notable upgrades. A moon dial was added, along with a day dial. It’s also a foot larger than “Perpetual No.1”, which may not sound like a lot, but that extra foot doubled the weight and gear size.


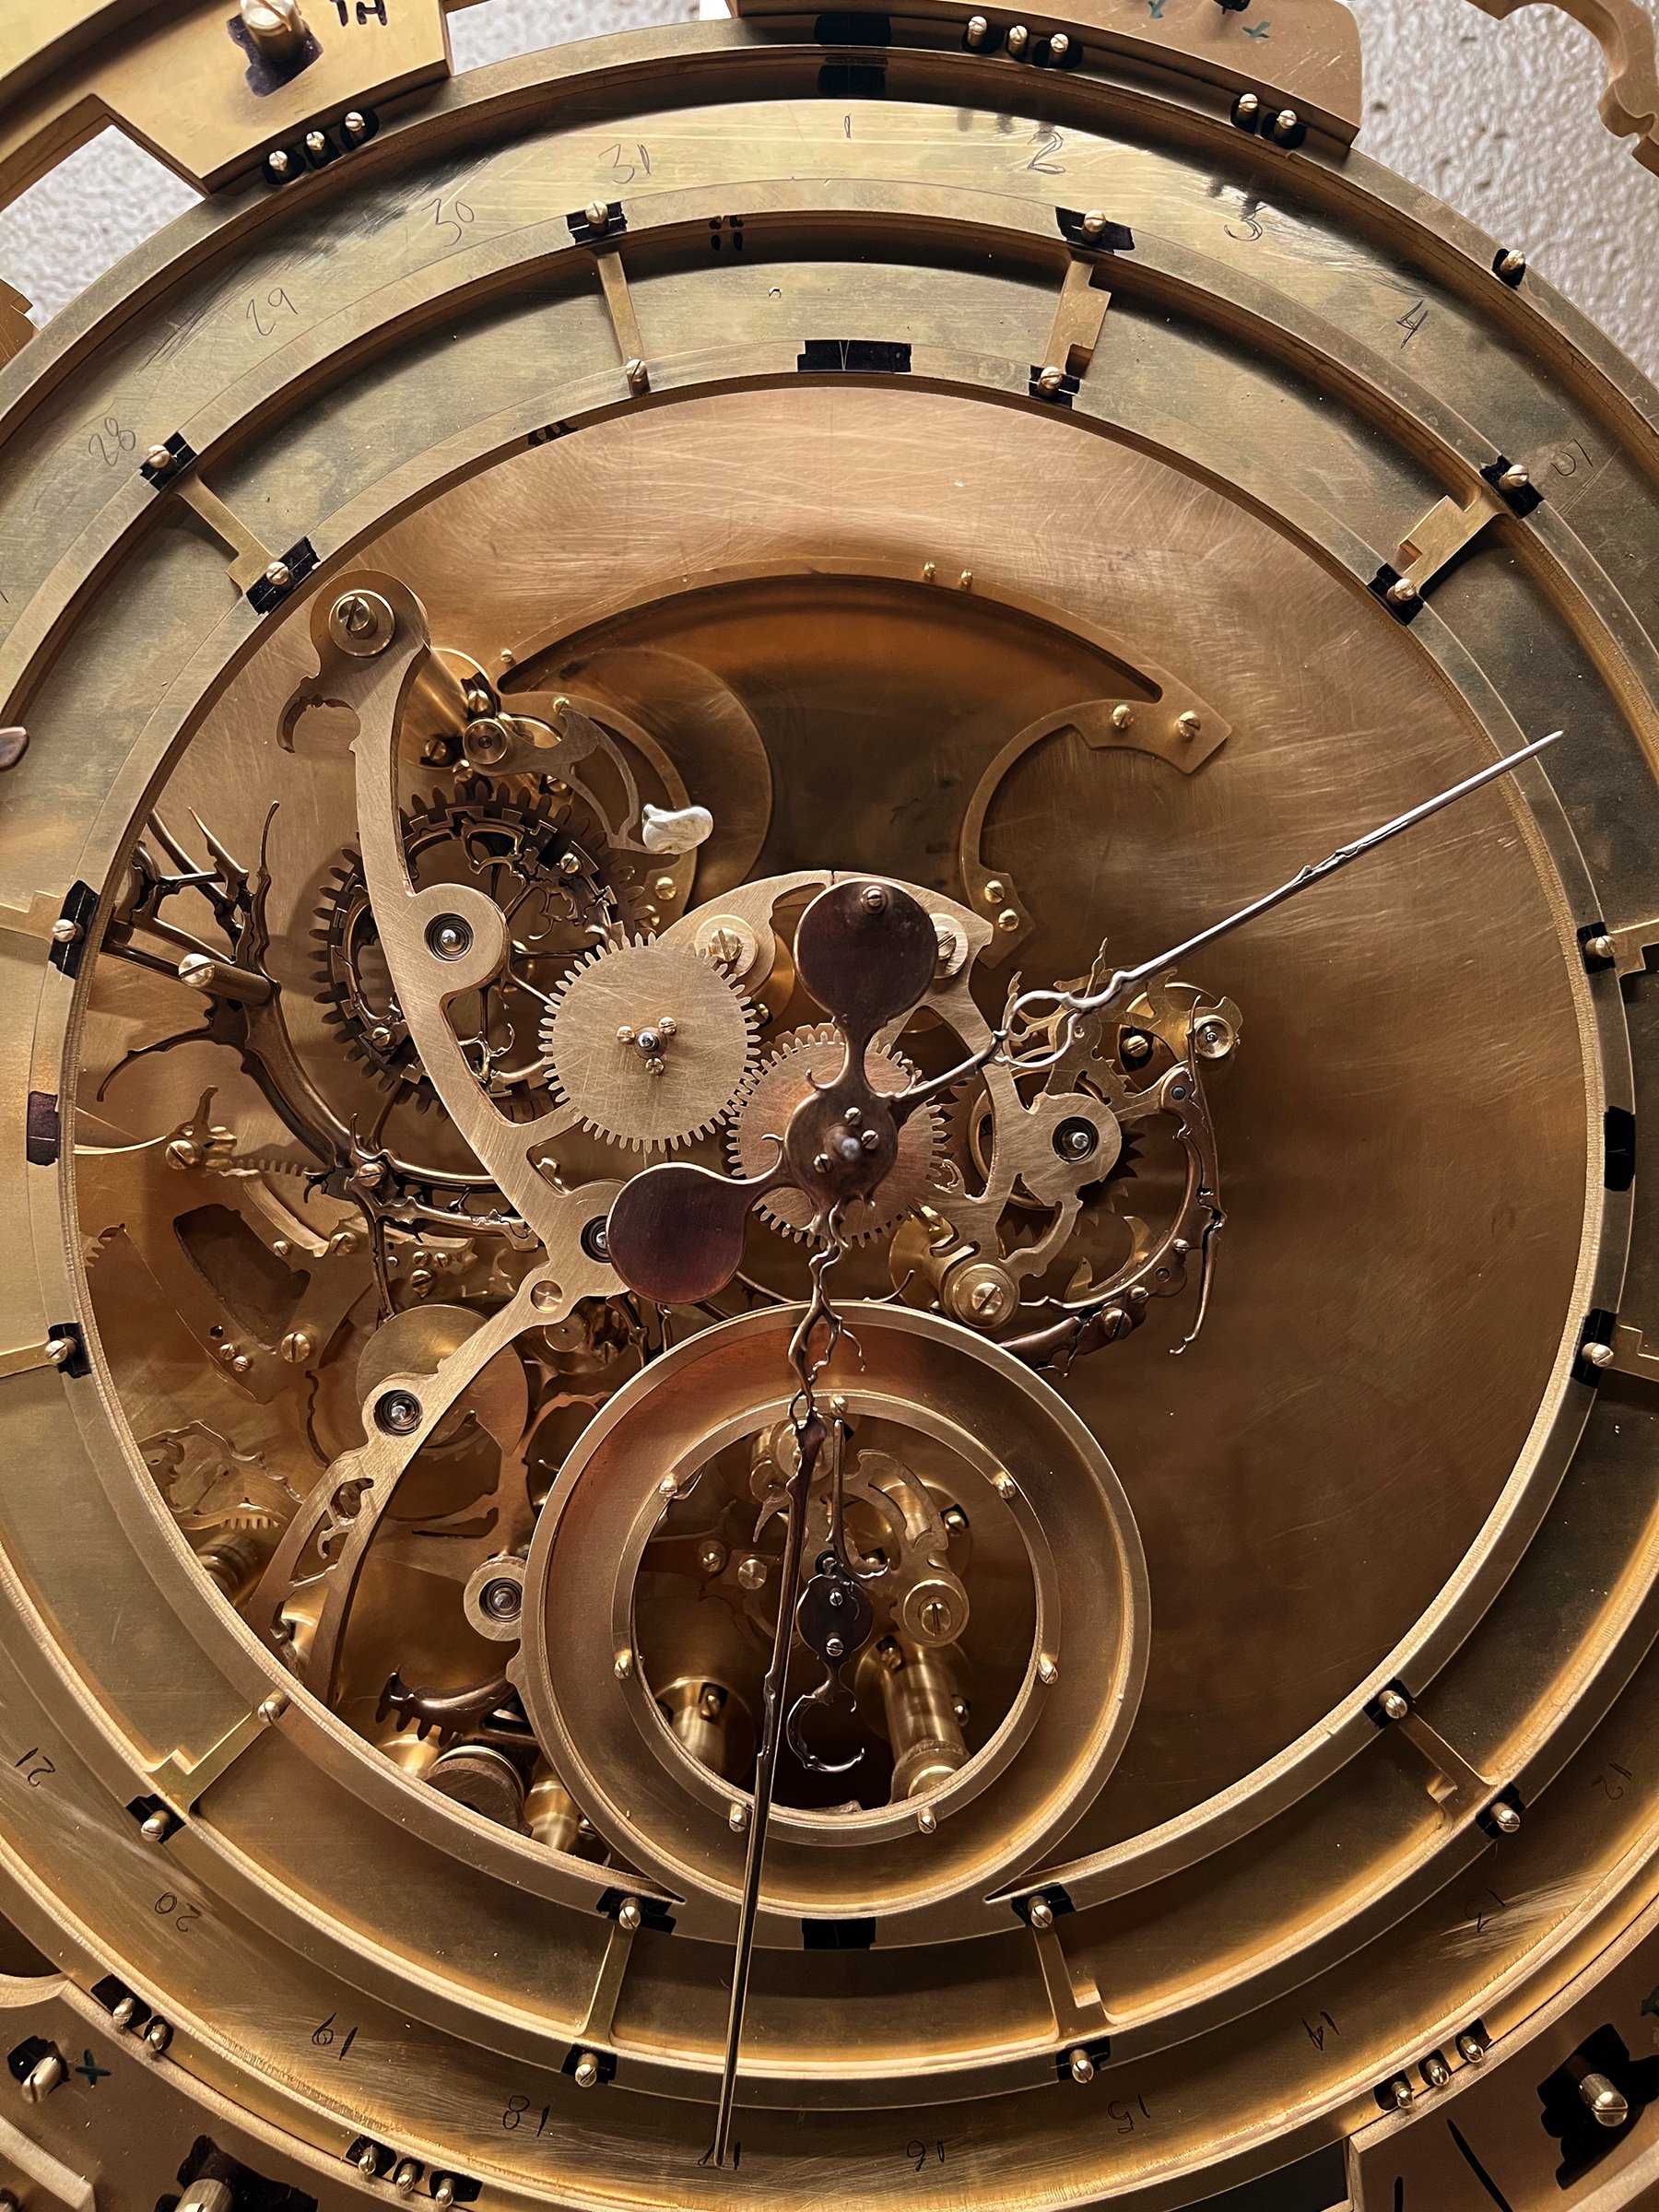
For anyone not familiar, a perpetual calendar complication keeps track of the date, including mechanically accounting for whether a month has 30 or 31 days, and even automatically adjusts for the 28 days in February, and 29 days in a leap year. The perpetual calendar mechanisms that I create switch instantly at midnight, so in the video, you can see the clock automatically click four full days when the hands pass 12:00 p.m.


The moon dial has four different faces, and between those are constellations visible from the southern hemisphere. The large display for the four moons required a disc that took up almost all the space behind the perpetual calendar mechanisms. That means that all the mechanisms for the perpetual calendar had to be in front. Oftentimes, mechanical challenges and constraints can lead to aesthetic discoveries. This is one such case for me. The result of pushing all the mechanisms in front led to a large moon nestled above a forest of gears and levers, similar to the actual moon above a forest of trees.


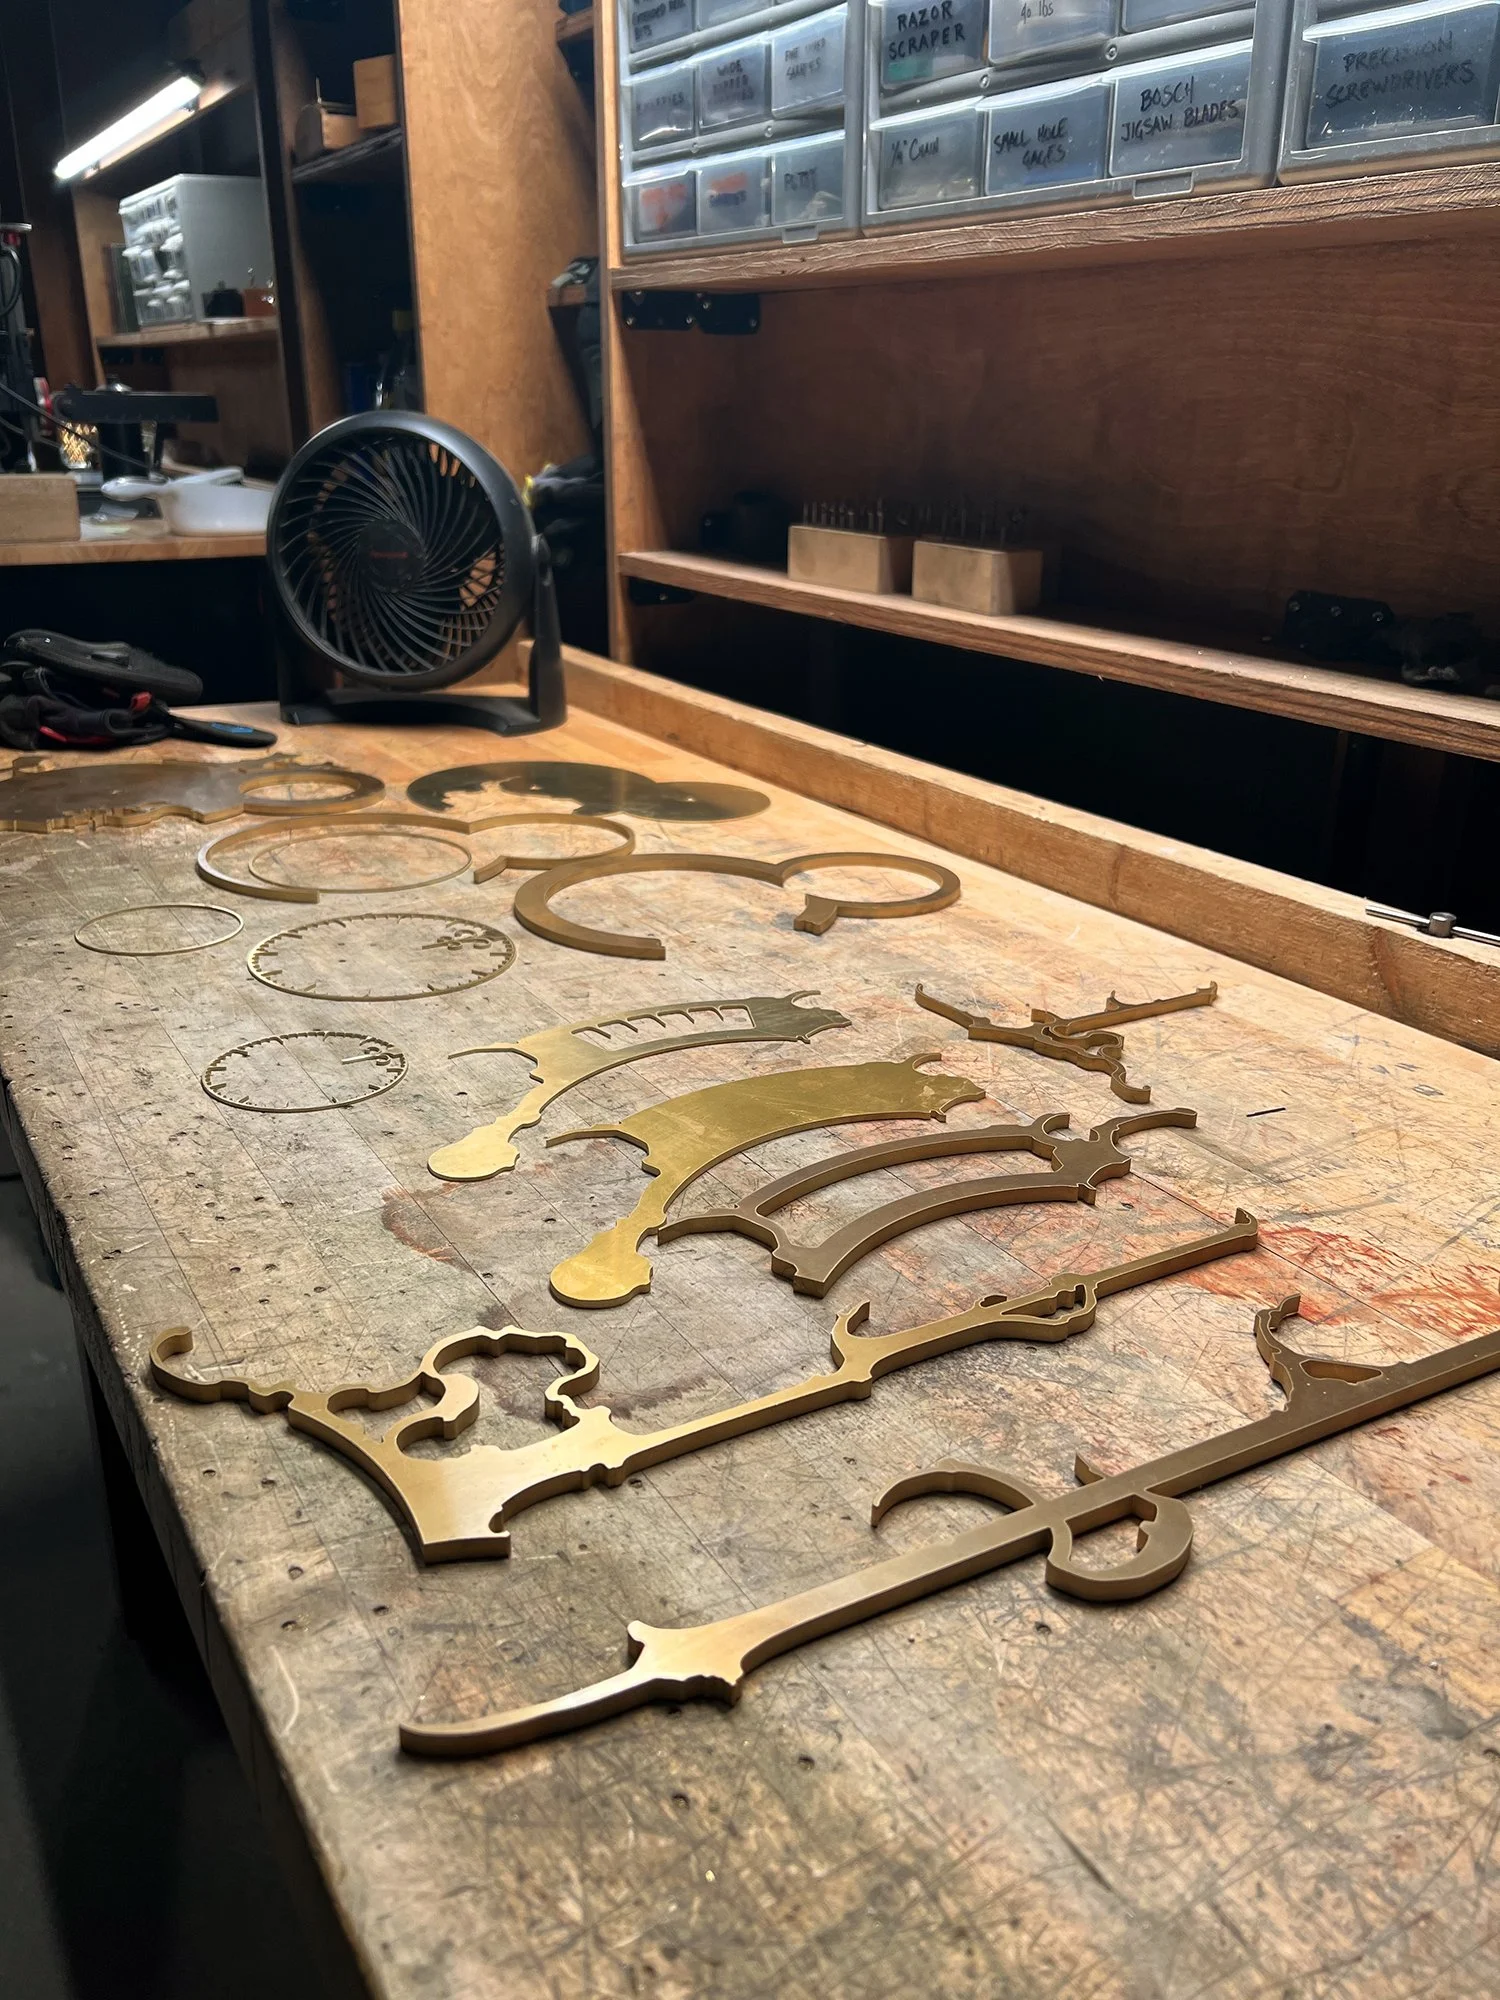
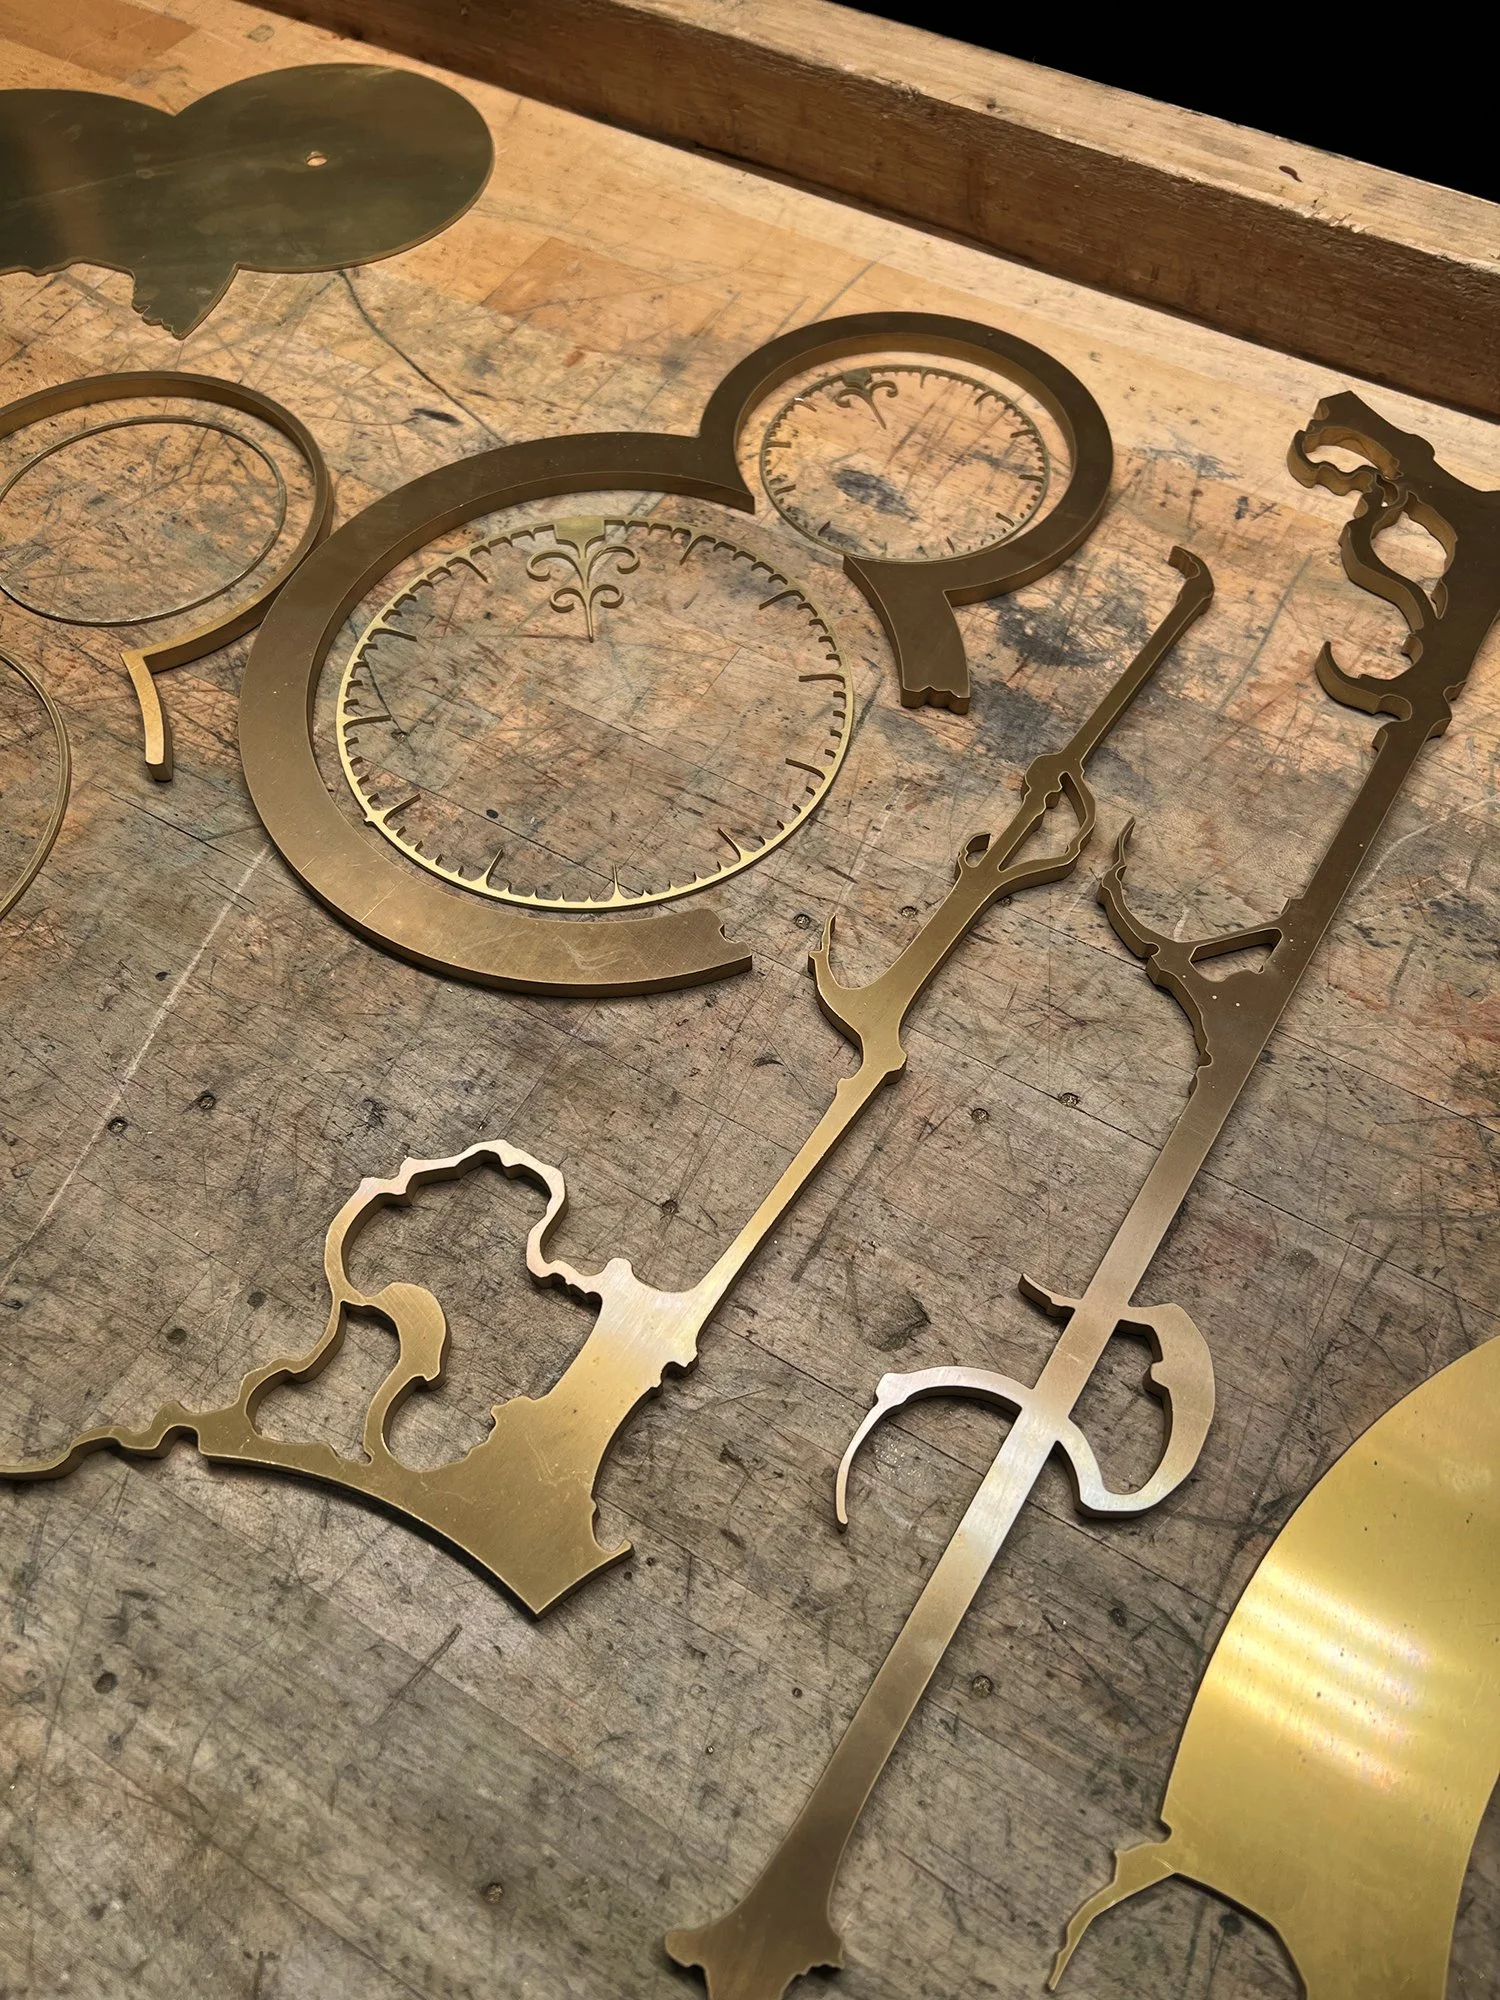
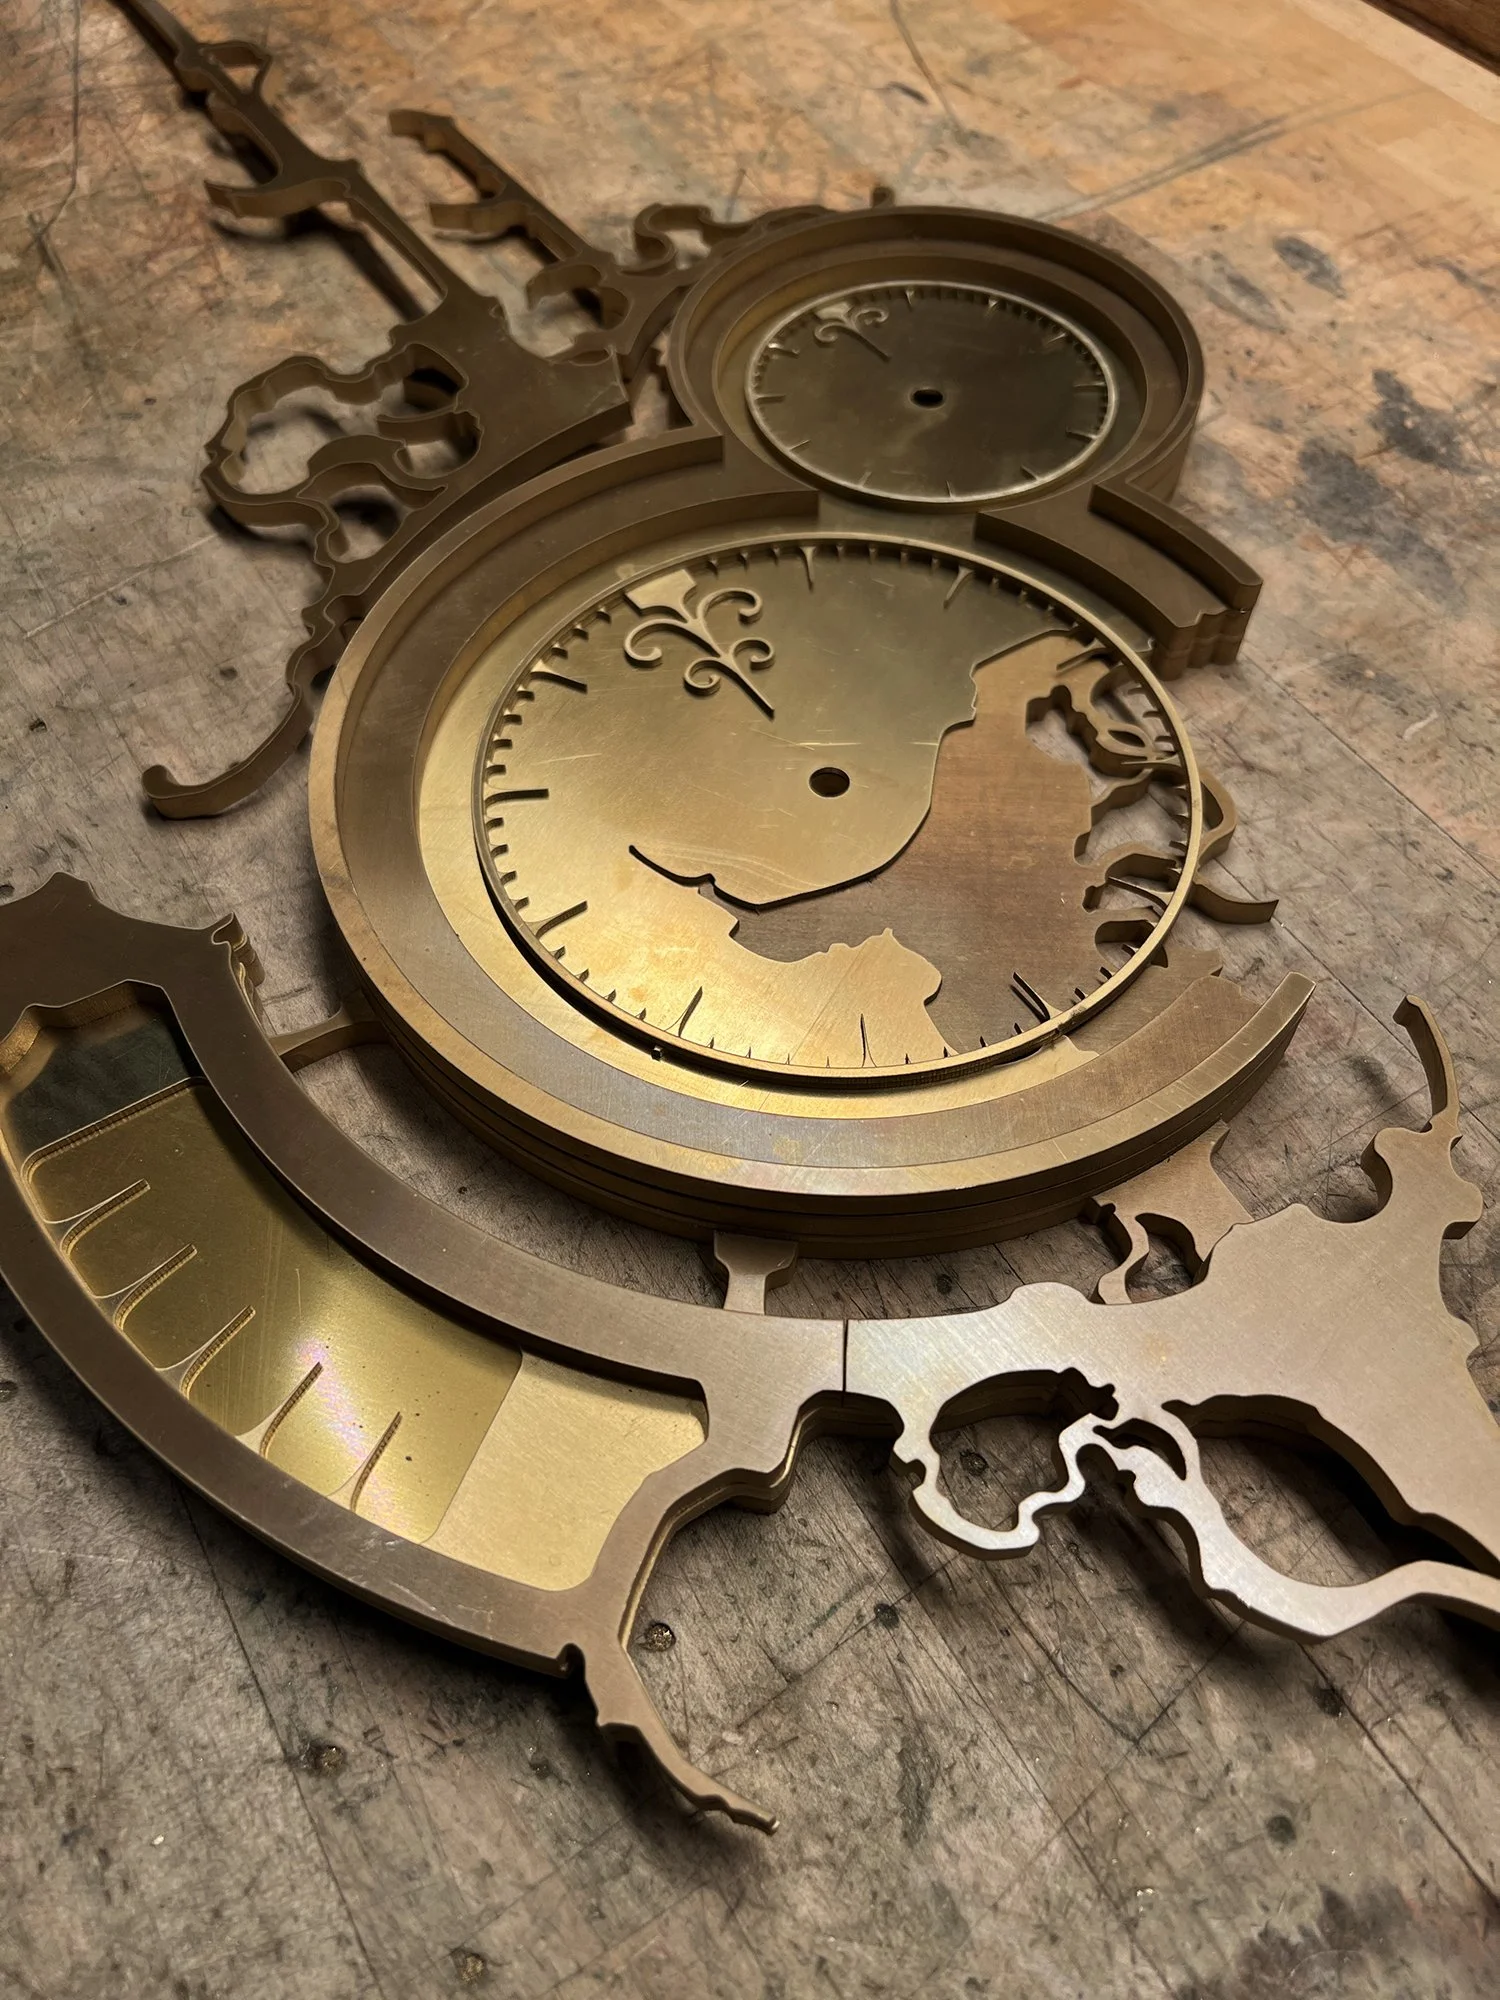
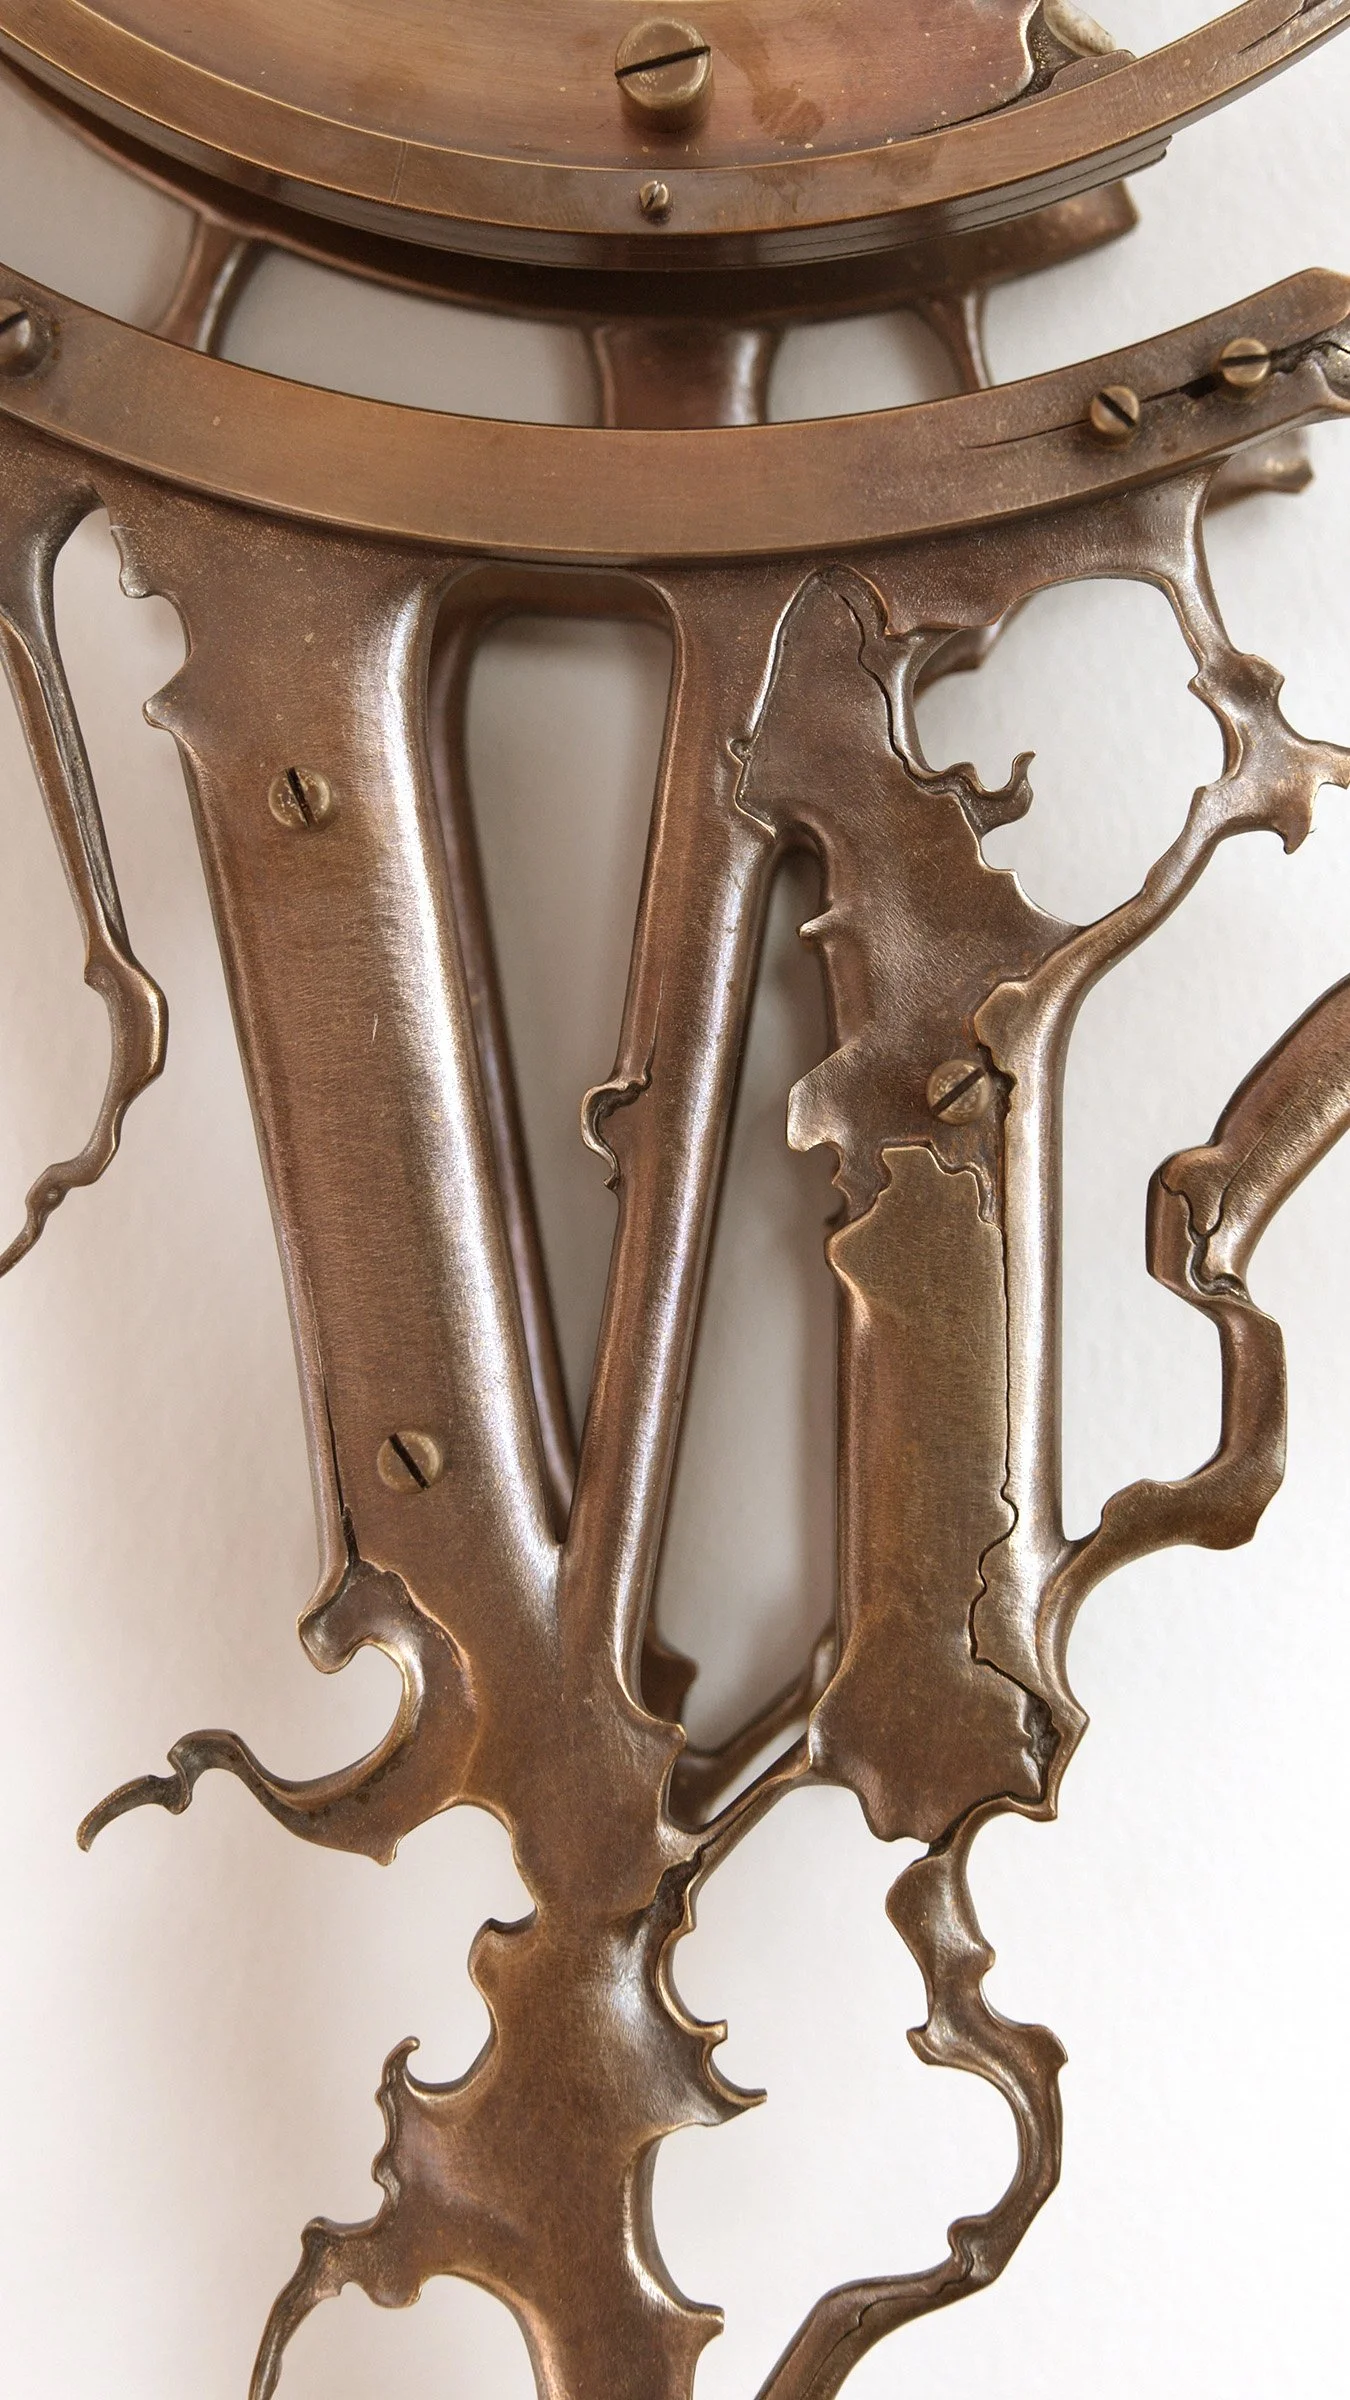
There are a couple things to note about the main gears for this clock. The spokes are designed to mirror the overall design of the clock itself. Each spoke depicts the frame of the clock running down the middle, with the number-panels splayed out around it. Because of the size and the amount of detail, these gears also took significantly longer to sculpt than any others to date.


I’ll be delivering and installing this piece in the next months. While I’m looking forward to the trip, I’ll be sad to see this clock go. 


Finished!

Finally!

Sometimes things go much quicker than expected, and sometimes they take a little longer. This project took longer…roughly 600 hours longer.

It’s entirely my fault. This piece was supposed to be a slightly larger and slightly more complex version of “Perpetual No.1”. But instead…well, I got a little carried away.

That’s a good thing, of course. “Getting carried away” usually means I’m taking my work to another level, and this project was an opportunity to do just that.

While everything is essentially finished, there are still some personal additions that I’ll be making for the client. And while I run the clock and do a final test on the mechanism, there will be, as there is with every piece, some little things I notice which I’ll want to refine.

That said, this epic journey is coming to a close. I’m going to savor every second I have with this piece before delivery to Australia.

As stated in the video, I’m going to build a large wall and create a simple “set” to film the finished video of this horological achievement. In the mean time, I wanted to get some preliminary footage out there for everyone to see.

Enjoy!

Last look before disassembly

I’ve done about all I can with the clock on the wall. The hands, numbers, and some of the gears could be finished without interrupting the ticking, but now I have to take it off the wall and disassemble it so I can sculpt the inside bits.

Home stretch (sort of)

Finished Numbers

The main dial numbers are finished!

Last post I’d just finished all the frames for the numbers. I hadn’t carved up the point on the right yet, and I’ve finished that. But the big news is that all the numbers are painted.

Getting the weathered and tattered finish on these paper panels is a lot of fun, but can be kind of a nervous and frustrating process. Painting the numbers and line-work takes a lot of time. To get this finish I have to immerse all those hours of work in water, and sort of scrub away at it to rough up the paper fibers. The paper likes to warp, and the way the paint takes to the surface can be a little unpredictable. A few of these had to be redone once or twice because I didn’t like the way they came out.

Really happy that these are finished! This is one of those steps that really changes the look of the clock.

Now it’s on to the calendar dials.

Grinding Away

Six out of eight of the number panels/frames are finished along with the spire protruding from the left. I still have to finish the 12 & 1, the right spire, and the perpetual dials. Then I start painting the numbers that go in the frames.

A few years ago I purchased a second rotary tool that’s well suited for very fine detail. This was both a game changer and a curse. I can’t help myself, so my sculpting has a lot more detail and refinement, but also takes a lot more time and work. No shortcuts for the good stuff.

Lots of grinding ahead. Thanks for your patience ;)

More hands

I’ve designed, cut, and carved up the hands for the calendar dial. This includes the small 1-1 gears needed to make the months and date come out of the same axis. 

Also, slightly less noticeable, I finished the big moon-gear and the disc that the moons will go on. You can see them in the window now, although it’s just unfinished brass at this point. Soon that window will cycle through four different moon faces, with stars in between.

Hands & Pendulum

The new clock has been ticking away for a couple of weeks now. The next step was to make it tell time, which meant completing the pendulum, and giving the clock a pair of hands.

In order to put hands on the clock I also needed to make the set of gears that create the 12-1 ratio between the hour and minute hand (called the motion works). I also made the 60-tooth click for adjusting the time. Finally, stacked in the middle of everything, the cam that lifts and drops the arm that operates the other functions of the clock (moon, day, date, month).

Once all of that was finished I made hands, which I designed in the spirit of “Perpetual No.1”.

Then it was on to the pendulum. Since carving any of the components changes the weight, and thus the timing, I needed to completely sculpt and finish everything before I could begin adjusting the pendulum for accuracy.

Now that the pendulum is finished I can run the clock, check the time, and chop the pendulum rod shorter and shorter until it swings at the right pace.

It has a pulse

There are three significant moments during the creation of each piece. Conception, completion, and in between, the first ticks. It’s that fun stage where I hang a dumbbell from the line for temporary weight, and use a quick clamp for a pendulum bob, just so that I can get it ticking on it’s own power as soon as possible. For a day or two I’ll come home after being away and excitedly open the door to see if it’s still ticking away. It’s very satisfying, and will always be one of my favorite moments with each clock that I make.

In addition to hearing it’s pulse, this marks the first time I’ve seen the entire piece assembled and on the wall. I had a sense of the size from laying the pieces out on tables, but now that it’s all together…wow. This one is substantial. For the longest time all I had were tables full of pieces. It was hard to get a sense of how much progress I was making. Now, seeing it all come together, I finally feel like I’m getting somewhere. 

There’s still sooo much to do. Can’t wait to finish this one!

Escapement Finished

The escapement is finished!

I still need to test and tweak a few things. Most noticeably the counterbalance of the lift arm, to which I’ve squished a piece of putty to temporarily test the weight, and watch the escapement tick. Very accurate engineering technique ;)

The lift arm (at least that’s what I call it) is the one on the left with the little crutch that engages with the pins. Each tick, that arm gets lifted up and sits in place with potential energy, waiting for the pendulum to unlock it. The heavier that arm is, the more energy is given to the pendulum each swing, but it also means that more energy is required to lift it up. When things are geared-up as much as a clock, the tiniest bit of energy on the escapement end of the gear train can equate to a ton of weight on the other end. The pendulum only needs a tiny tiny push to keep swinging. It has very little friction, and plenty of inertia. For that reason, when I design this style of escapement (called an arnfield gravity escapement) I extend an arm on the other side, and thread it for screws. I can vary the size/weight of the screws until the lift arm effectively weighs very little.

The lock arm (the other one) is the same principle. In order for the lightweight lift arm to be able to bump the lock arm and release the escape wheel, it also needs to weight almost nothing. Right now it’s actually working without any screws for counterweight, but I’ll eventually add a little one so that you can basically breathe on it and it will unlock.

It’s really good to have this part finished. Now it’s on to the back plate & the mounting bracket. Then I should be able to mount the clock on the wall and get it ticking under it’s own power.